SSL Certificate For Azure Website using Godaddy .
OR
Step By Step Guide for Implementing Godaddy SSL Certificate on Windows Azure Website.
Today I got a task of implementing an SSL for a sub domain of one of our client .So i Did the Implementation so i am sharing my effort and knowledge.
Step 01: First Generate a Certificate Request i.e CSR.
Open the IIS Manager(Type IIS in Windows Search and click on IIS ).
When you will click on IIS then this screen will come.In that Screen just click on Server Certificate.
On the Server Certificates Screen , click Create Certificate Request .
Fill all the details for the certificate.
Make sure that the common name matches your domain name. In my case If you are using a Godaddy
wild card certificate for a subdomain. Then used common name something like *.mydomain.com.
Choose Cryptographic Service Provider
This step is quite important to note, and this is where you follow the Azure guideline for certificate to be
at least 2048.
Choose the file path to generate the CSR. This file contains the message code that is used by SSL provider for generating digital identity Certificate.
The File Will Be Something like this.
-----BEGIN NEW CERTIFICATE REQUEST-----
MIIEaDCCA1ACAQAwezELMAkGA1UEBhMCSU4xEjAQBgNVBAgMCUthcm5hdGFrYTES
MBAGA1UEBwwJQmFuZ2Fsb3JlMR0wGwYDVQQKDBRMb3ZlIFdpdGggVGVjaG5vbG9n
eTELMAkGA1UECwwCSVQxGDAWBgNVBAMMD2xvdmV3aXRodGVjaC5pbjCCASIwDQYJ
KoZIhvcNAQEBBQADXXXXXXXXXXXXXXXXXXXXXXXXXXXXXXXXXXXXXXXXXXXXXXXX
XXXXXXXXXXXXXXXBZQMEAQIwCwYJYIZIAWUDBAEFMAcGBSsOAwIHMAoGXXXXXXXX
CCqGSIb3DQMHMB0GA1UdDgQWBBQ0hA5sL7ClGR9/Bj0YiO/tn9M3PTANBgkqhkiG
9w0BAQUFAAOCAQEAp9duVMU8+8/8XUsrALIoRnDW0mOwDQRhnpJCYVDqHZqztRrO
ZRKMz788+qqtUrO5yVsRx4pbUg752f+/UBeTM+Z0Yg4FiWQpMAr+59/9/m0Fw/W7
bjocnzx0nizy/Uw8BVhFFQwH4rWOpjxWeftbXGx+YLa7QrhQMJzLYG3LSljjFz+c
Usv1KPsmF+DTZPYIEk64eYUcchP19QXKb162i62TAEferhb71+412pJb0zltj2Uw
e7cvZ1xdascdQG5MXLqzsXZ0yiLP/6/i4X9IgUl3xp/mU1w4HSC1IS7zq56IWTJR
NTyBIJV8CP+K8M1DQmtJek0clhlwMV9ek9nwBA==
-----END NEW CERTIFICATE REQUEST-----
Logon to your Godaddy account, and from product tab click SSL Certificates.
Note that you need the entire text of the CSR file to submit the request. I won’t include all
the sub steps here since it’s a relatively simple process and it’s very well documented by Godaddy at this link. Requesting a standard or a wildcard certificate


Download the certificate Zip file after you’ve submitted the request.
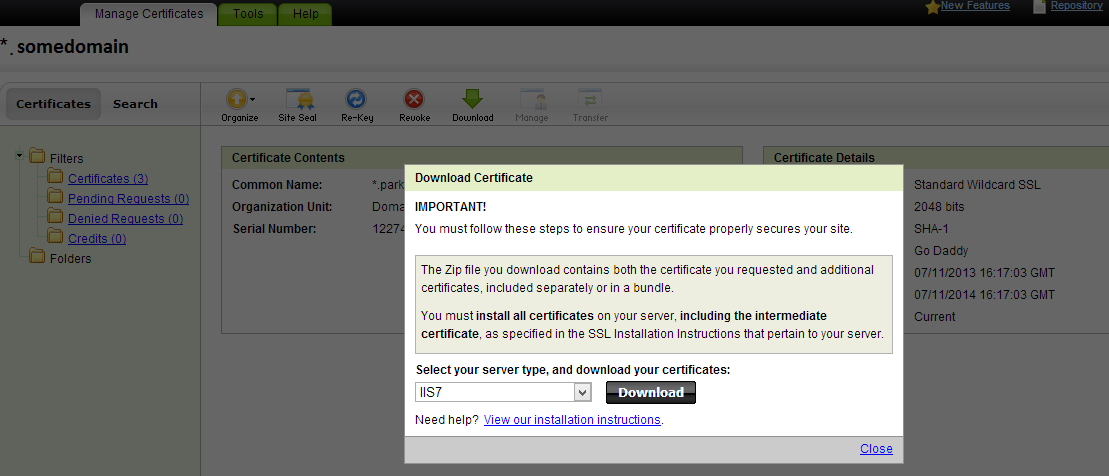
After the download, you’ll observe that there are two files in the zip, one is a *.crt (Server Certificate) file and other is of type PKCS #7. Ignore the PKCS #7 Certificate file, and instead use the *.crt file. Go to Server Certificate option in IIS 7 and click Complete Certificate Request.
Provide the path of the *.crt file, and fill out the details on the form. Note make sure you change the file types to *.* Once completed you will see a row entry with name of your certificate.
Some time it will give error , so just close the iis and open it again, now you can see the certificate.
Right click the certificate and click export to convert it into *.pfx file for uploading it on
Azure. Note that this conversion of crt to pfx is required since *.crt alone only contains the
public key but the azure would also need private key to do end to end encryption. Make sure
you note the password since while uploading it on Azure Account you’d need this.
Now We have to import PFX file into Azure.For that Go to Azure Portal for the website in which you want SSL.
Click on Domains and SSL and then on the Upload button. You’ll then be able to browse to
your pfx file and to enter your password. Click on Save when done.
Last : Bind configured domain names to the certificate
The final step is to link each configured domain to the certificate. This step I had to do in the
old portal. The reason was that Azure needed to ask me if I was aware of the potential
extra costs of using a certificate, before it could be approved, and that dialog box never
showed up in the new portal. But the steps are the same on the old and the new so no
problems.
Now, it should all be up and running for all your configured domains.


