Saturday 27 August 2016

Getting Started with ASP.NET Web API 2 (C#) Part 4

Returning IHttpActionResult


We mentioned above that the HttpResponseMessage object is a standard object to return from Web API actions. Web Api 2 introduces another type of object that you can return from an API action: IHttpActionResult. It is similar to ActionResult in standard ASP.NET MVC. In MVC you can return JsonResult, ContentResult and View objects. With this new return type in the Web API you can return similar objects that are specific to HTTP traffic:

  1. OkResult
  2. NotFoundResult
  3. ExceptionResult
  4. UnauthorizedResult
  5. BadRequestResult
  6. ConflictResult
  7. RedirectResult
  8. InvalidModelStateResult

…and many more. You can even create your custom Result object by deriving from an existing concrete object that implements the IHttpActionResult interface or by implementing the interface directly. Let’s see how we can transform our current code.
Let change
To
The code will not compile any more of course as the HttpResponseMessage object doesn’t implement this interface. It’s incredibly easy to send a NotFount and Ok response. Change the body of Get(id) to the following:

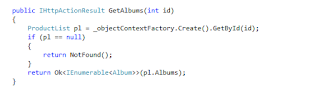
We can change GetAlbums to the following:

Tuesday 23 August 2016

Getting Started with ASP.NET Web API 2 (C#) Part 3

Routing by attributes

Today we will see new built-in feature in asp.net web api 2 which lets you declare the routing rules by standard C# attributes. It started its life as a NuGet package but now it’s readily available in .NET. The attributes can be applied on the controller level as well. Examples:
You can even declare multiple routes for a single action:
Let’s see if can get the api/product/{id}/albums url to work.


Re-run the app and see if the api/product/1 URL still works. It doesn’t. The problem is that we have two methods in the Controller whose name starts with “get” and accept a parameter of type int. The routing engine doesn’t know which one to call.
Inspect the WebApiConfig.cs file. Note the following call:
This call comes before the standard…


…declaration. This will ensure that the routes defined in the attributes will take precedence: if the request URL matches one of the attribute URLs then the routing engine will not search any longer.

Add the following attribute over the GetAlbums action:

Run the app again. First check if api/product/1 works and it should. 
Now go to api/product/1/albums and you should be presented with the XML representation of the albums of product 1. 

Also, try with an invalid ID, such as api/product/0/albums. You should get a 404.0 error which tells you that the URL wasn’t found.

 This is because of the constraint we added to the attribute.


Monday 22 August 2016

Getting Started with ASP.NET Web API 2 (C#) Part 2

We finished the first part of this series with creating an in-memory data source and a Get() API method. 
The Get method returned the full list of ProductList records in the data repository.


We are ready to move on to other aspects of this technology. So open the demo project we started previously. We’re going to look at the following elements:

  1. Action method: get element by ID
  2. Routing by attributes
  3. Returning IHttpActionResult from controller action
  4. Cross origin resource sharing

Get an element by id

Now we can retrieve all elements in from the API in an XML string. We also want to be able to get a single item by its ID.
and the output we want by id and it will look like this.

So Now Open ProductController.cs and add the following stub:


We’ll be able to reach this action by the URL /api/product/{id}. It couldn’t be easier. The most obvious way is to add the following method to InMemoryDataContext.cs:

The body of the Get(id) method will be as follows:
Run the application and navigate to /api/product/1. You should get the XML representation of the ProductListwhose ID is 1:


What happens if you type an ID of a nonexistent productlist, such as 8? You’ll get a null XML back:

Let’s make this a bit more obvious to the caller. Change the signature of the Get(id) method to return an HttpResponseMessage instead of a productlist:


This object allows us to control the response message we return to the caller of the Get(id) method: the response code, the headers, the message content, i.e. all elements of a standard HTTP response. It is customary to let Web API actions return this object. In the body of the action we can return a 404 if the item wasn’t found. Otherwise we return a 200 OK with the ProductList object. Here’s one way to solve this:

Re-run the demo app, try to get a productlist with an ID of 8 and you should get a XML formatted error message:

The next operation that would be nice to implement is to retrieve the albums of a productlist by the URL api/productlist/3/albums. Routing of such URLs in the previous version of the Web API was a bit tricky. You could set up your custom routes in WebApiConfig.cs, but it could get messy if you wanted to support extended urls beyond the basic /api/{controller}/{id} format. However, in Web API 2 there’s a different way.

We will see that in next Post.


Saturday 20 August 2016

Getting Started with ASP.NET Web API 2 (C#) Part 1

- ASP.NET Web API is a framework for building HTTP services(web APIs on top of the .NET Framework. ) that can be consumed by a broad range of clients including browsers, mobiles, iphone and tablets. 
ASP.NET Web API has been around for some years now. It is a very efficient and lightweight technology to build RESTful web services in .NET.
Web API is very similar to ASP.NET MVC since it contains the MVC features such as routing, controllers, action results, filter, model binders, IOC container or dependency injection. 
-  Therefore if you are familiar with MVC then it’s easy to understand Web API either.

DEMO
In this tutorial, you will use ASP.NET Web API to create a web API that returns a list of products. 
I’m building the demo using Visual Studio 2013 Professional.
So open VS 2013 and create a new ASP.NET web project called ProductDataClient


Click OK and then select the Web API template:

Check The Authentication. It should be Individual User Accounts. If not then click Change Authentication and make it  Individual User Accounts from the list of options.

Click OK

Now you’ll have a project structure like this


Press F5 or Run the project. you’ll see a default web site.


It look like a normal MVC website. But some differences are there like
no link to log in or sign up new users anywhere. 

So what's new .. There is API link, up in the navigation bar. 
Click on that ,This is a documentation page for the available URL endpoints of the web api.


Click on GET api/values and you’ll see an example for the JSON and XML response structures:
If you check out one of the POST urls then the documentation will show you the expected request body format as well:
Click on POST api/Account/Register

The documentation is provided by a pre-installed NuGet package: Microsoft.AspNet.WebApi.HelpPage. It will look for ApiControllers in your project and any documentation available on them using Reflection. You won’t find an assembly reference to this package under the References section so don’t look for it. However, there’s a HelpPage area in the solution:

The controllers, models and views in this area help construct the Documentation page we’ve just seen. Any new API controller you create will be added to the documentation. You can add comments in the usual way: just decorate the Controller with VS XML comments:
Go to ValuesController and add comments like this
Also, you need to let VS generate an XML documentation file:
Right click on the project and select Properties

Click on Build

We’re not done yet. Locate the HelpPageConfig.cs file in the Areas/HelpPage/App_Start folder. There will be some code already but it’s all commented out. Uncomment the first line and modify the file name to match what you provided in the previous step:

Rebuild and run the project. If you get a runtime exception saying that the documentation XML file wasn’t found then check the file URL again in the code we’ve just commented out. It may have been overwritten. The documentation page should show the new description:


Values controller

You can call the values controller in the browser to check if the Get() method is working. The URL should be http://localhost:59693/api/values. The port number in your case may of course differ. At first you should get an error message saying that the request was unauthorised. That’s because the ValuesController has been decorated with the [Authorize] attribute. 

Uncomment it and refresh the page. You should see an XML with the default values returned.


Model data

Any demo on the Web API is futile without a data source. Let’s build a class hierarchy in the Models folder. Note that your domains should exist in a separate project of course but this post is not about layered architecture but the Web API. 
In this we are working with in-memory data.
Locate the Models folder and add a new folder in it called Domain. We’ll build a simple data hierarchy . Add the following classes to the Domain folder:

Next we’ll set up the in-memory repository to get some data to start with.

Insert a new folder called Repository in Model Folder and Create InMemoryDataContext.cs .

namespace ProductDataClient.Models.Repository
{
    public class InMemoryDataContext
   {
        private List<ProductList> _productList;

        public InMemoryDataContext()
        {
            _productList = ProductLists();
        }

        public IEnumerable<ProductList> GetAll()
        {
            return _productList;
        }

        public static InMemoryDataContext Instance
        {
         get
         {
           return Nested.instance;
         }
        }

        private class Nested
        {
         static Nested()
         {
         }
         internal static readonly InMemoryDataContext instance = new InMemoryDataContext();
        }

        private List<ProductList> ProductLists()
        {
            List<ProductList> productList = new List<ProductList>();

            ProductList p1 = new ProductList();
            p1.Name = "Great band";
            p1.Id = 1;
            p1.Albums = new List<Album>(){new Album(){Title = "First album", Year = 2000}, new Album(){Title = "Second album", Year = 2003}
                , new Album(){Title = "Third album", Year=2005}};
            p1.Prizes = new List<Prize>() { new Prize() { Name = "Best band" }, new Prize() { Name = "Best newcomers" } };

            ProductList p2 = new ProductList();
            p2.Name = "Funny band";
            p2.Id = 2;
            p2.Albums = new List<Album>(){new Album(){Title = "Debut", Year = 1979}, new Album(){Title = "Continuation", Year = 1980}
                , new Album(){Title = "New Year", Year=1982}, new Album(){Title ="Summer", Year=1985}};
            p2.Prizes = new List<Prize>() { new Prize() { Name = "Cool band" }, new Prize() { Name = "Best band" }, new Prize() { Name = "First choice" } };

            ProductList p3 = new ProductList();
            p3.Name = "Sounds good";
            p3.Id = 3;
            p3.Albums = new List<Album>() { new Album() { Title = "The beginning", Year = 1982 }, new Album() { Title = "The end", Year = 1986 } };
            p3.Prizes = new List<Prize>() { new Prize() { Name = "First choice" } };

            ProductList rb = new ProductList();
            rb.Name = "Sounds good";
            rb.Id = 4;
            rb.Albums = new List<Album>() { new Album() { Title = "Cool", Year = 1988 }, new Album() { Title = "Yeah", Year = 1989 }
                , new Album() { Title = "Oooooohhh", Year = 1990 }, new Album() { Title = "Entertain", Year = 1991 }, new Album() { Title = "Go home", Year = 1992 }};
            rb.Prizes = new List<Prize>() { new Prize() { Name = "First choice" }, new Prize() { Name = "Cool band" } };

            productList.Add(p1);
            productList.Add(p2);
            productList.Add(p3);
            productList.Add(rb);

            return productList;
        }
}

}

Add the following components necessary for the thread safe lazy singleton pattern:

Add one interface file in Model Folder
We have our data store so we’d like to extract the Productlist data via an API call.
Product controller

Right click the Controllers folder and select Add and then Controller from the context menu. The Add Scaffold window will appear. Select the Web API 2 Controller – Empty option and click Add. In the Add Controller window insert the controller name: ProductController. The new controller will derive from ApiController as expected.

Add the following private field and constructor to the controller:
Insert the following Get() method into the controller:

public IEnumerable<ProductList> Get()
        {
            return _objectContextFactory.Create().GetAll();

        }

RUN => redirect 
http://localhost:59693/api/Product 


Add caption


DONE :)


Wednesday 20 July 2016

The User Profile Service failed the logon” error message. How to Solve ?

The User Profile Service failed the logon” error message


To solve this Problem First you have to Start your computer in safe mode.


Step 1: For That you should restart your computer and tap F8 after the BIOS POST screen to bring up the boot menu. Select Safe mode from the list.


Step 2: Click Start, type regedit in the Search box, and then press ENTER.

Step 3 : In Registry Editor, locate and then click the following registry subkey:
HKEY_LOCAL_MACHINE\SOFTWARE\Microsoft\Windows NT\CurrentVersion\ProfileList

Step 4 : In the navigation pane, locate the folder that begins with S-1-5 (SID key) followed by a long number.

Step 5: Click each S-1-5 folder, locate the ProfileImagePath entry in the details pane, and then double-click to make sure that this is the user account profile that has the error.


Step 6: If you have two folders starting with S-1-5 followed by some long numbers and one of them ended with .bak, you have to rename the .bak folder. To do this, follow these steps:
  1. Right-click the folder without .bak, and then click Rename. Type .ba, and then press ENTER.
  2. Right-click the folder that is named .bak, and then click Rename. Remove .bak at the end of the folder name, and then press ENTER.
  3. Right-click the folder that is named .ba, and then click Rename. Change the .ba to .bak at the end of the folder name, and then press ENTER.
If you have only one folder starting with S-1-5 that is followed by long numbers and ends with .bak. Right-click the folder, and then click Rename. Remove .bak at the end of the folder name, and then press ENTER.

Step 7:
7.1: Click the folder without .bak in the details pane, double-click RefCount, type 0, and then click OK.

7.2: Click the folder without .bak, in the details pane, double-click State, type 0, and then click OK.
7.3: Close Registry Editor.

Restart the computer.
Log on again with your account.

:)